Configurare un cluster Kubernetes
ro:Implementarea unui cluster Kubernetes ru:Развертывание кластера Kubernetes pl:Wdrażanie klastra Kubernetes ja:Kubernetesクラスタのデプロイ zh:部署一个Kubernetes集群 de:Bereitstellen eines Kubernetes-Clusters nl:Een Kubernetes cluster implementeren pt:Implantação de um aglomerado Kubernetes es:Despliegue de un clúster Kubernetes en:Deploying a Kubernetes cluster it:Configurare un cluster Kubernetes fr:Deployer un cluster Kubernetes
Cosa è Kubernetes ?
Kubernetes è una piattaforma open-sorce che si pone l’obiettivo di gestire i carichi di lavoro e dei servizi containerizzati.
Kubernetes permette di configurare manualmente e in maniera automatica.
Kubernetes è un grande ecosistema in rapida espansione.
Questa procedura vi permetterà di impostare rapidamente e facilmente un cluster Kubernetes (k8s) di tre nodi a partire da tre istanze CentOS 7 della stessa rete.
Una di queste 3 istanze sarà il nostro nodo principale e le altre due saranno i nostri nodi operativi.
Riassumendo, il nodo principale è quello dal quale gestiamo il cluster Kubernetes (orchestrator container)
dalla sua API e i nodi worker sono quelli su cui verranno eseguiti i pod, ovvero i container (Docker nel nostro caso).
Partiamo dal principio che le nostre 3 istanze CentOS 7 sono già installate e che eseguiamo l’accesso in SSL, queste sono condizioni assolutamente necessarie.
Ecco la configurazione che abbiamo nel nostro esempio :
Node master : "k8s-master" / 10.1.1.16
Premier node worker : "k8s-worker01" / 10.1.1.169
Second node worker : "k8s-worker02" / 10.1.1.87
Preparazione del sistema et installazione di Kubernetes tutorial
Le azioni che seguono sono da effettuare in tutte le instanze (master e workers) come root.
Comincia con il riempire il file /etc/hosts su ognuna delle vostre instanze.
Nel nostro esempio ecco il file per le nostre 3 istanze :
    cat /etc/hosts
    127.0.0.1 localhost
    ::1 localhost

    10.1.1.16 k8s-master
    10.1.1.169 k8s-worker01
    10.1.1.87 k8s-worker02
Attiva il modulo bridge e le regole iptables per quest'ultimo tramite i seguenti tre comandi:
    modprobe bridge
    echo "net.bridge.bridge-nf-call-iptables = 1" >> /etc/sysctl.conf
    sysctl -p /etc/sysctl.conf
Aggiungi il repository YUM Docker :
    cat <<EOF > /etc/yum.repos.d/kubernetes.repo
    [kubernetes]
    name=Kubernetes
    baseurl=https://packages.cloud.google.com/yum/repos/kubernetes-el7-x86_64
    enabled=1
    gpgcheck=1
    repo_gpgcheck=1
    gpgkey=https://packages.cloud.google.com/yum/doc/yum-key.gpg https://packages.cloud.google.com/yum/doc/rpm-package-key.gpg
    EOF
Installa Docker :
    yum install -y docker-ce

    Poi installa i package Kubernetes necessari :
    yum install -y kubeadm kubelet kubectl
Modifica il file di configuarzion di systemd kubelet (/etc/systemd/system/kubelet.service.d/10-kubeadm.conf) per aggiungere la seguente riga nella sezione « [Servizio] » :
Environment="KUBELET_CGROUP_ARGS=--cgroup-driver=cgroupfs"
Come :
    cat /etc/systemd/system/kubelet.service.d/10-kubeadm.conf
    # Note: This dropin only works with kubeadm and kubelet v1.11+
    [Service]
    Environment="KUBELET_KUBECONFIG_ARGS=--bootstrap-kubeconfig=/etc/kubernetes/bootstrap-kubelet.conf --kubeconfig=/etc/kubernetes/kubelet.conf"
    Environment="KUBELET_CONFIG_ARGS=--config=/var/lib/kubelet/config.yaml"
    *Environment="KUBELET_CGROUP_ARGS=--cgroup-driver=cgroupfs"*
    # This is a file that "kubeadm init" and "kubeadm join" generates at runtime, populating the KUBELET_KUBEADM_ARGS variable dynamically
    EnvironmentFile=-/var/lib/kubelet/kubeadm-flags.env
    # This is a file that the user can use for overrides of the kubelet args as a last resort. Preferably, the user should use
    # the .NodeRegistration.KubeletExtraArgs object in the configuration files instead. KUBELET_EXTRA_ARGS should be sourced from this file.
    EnvironmentFile=-/etc/sysconfig/kubelet
    ExecStart=
    ExecStart=/usr/bin/kubelet $KUBELET_KUBECONFIG_ARGS $KUBELET_CONFIG_ARGS $KUBELET_KUBEADM_ARGS $KUBELET_EXTRA_ARGS
Ricarica le impostazioni, attiva e poi riavvia i servizi docker e kubelet attraverso i tre comandi seguenti :
    systemctl daemon-reload
    systemctl enable docker kubelet
    systemctl start docker kubelet
Disattiva la swap del sistema( kubelet non supporta la memoria swap) :
swapoff -a
Ricorda di commentare ed eliminare le linee inerenti alla swap nel file /etc/fstab di ognuno delle vostre istanze come di seguito :
#/dev/mapper/vg01-swap swap swap defaults 0 0
Inizializzazione del cluster kubernetes
Le azioni seguenti sono da effettuare unicamente sull’istanza node master
Lancia l’inizzializzazione del cluster kubernetes con il comando qui di seguito facendo attenzione a modificare il valore del parametro
"--apiserver-advertise-address=" dell’indirizzo ip della vostra instanza master.
kubeadm init --apiserver-advertise-address=<ip de votre instance master> --pod-network-cidr=10.244.0.0/16
Nota bene : Non modificare l’IP della rete "10.244.0.0/16" indicata nel parametro
"--pod-network-cidr=" visto che questo permette di indicare che utilizzeremo il plugin CNI Flannel per gestire la parte reti dei nostri pods.
Ecco a cosa dovrebbe somigliare il ritorno di questa istruzione quando il cluster si inizzializza con successo.
    [root@k8s-master ~]# kubeadm init --apiserver-advertise-address=10.1.1.16 --pod-network-cidr=10.244.0.0/16
    [init] using Kubernetes version: v1.12.2
    [preflight] running pre-flight checks
    [preflight/images] Pulling images required for setting up a Kubernetes cluster
    [preflight/images] This might take a minute or two, depending on the speed of your internet connection
    [preflight/images] You can also perform this action in beforehand using 'kubeadm config images pull'
    [kubelet] Writing kubelet environment file with flags to file "/var/lib/kubelet/kubeadm-flags.env"
    [kubelet] Writing kubelet configuration to file "/var/lib/kubelet/config.yaml"
    [preflight] Activating the kubelet service
    [certificates] Generated ca certificate and key.
    [certificates] Generated apiserver-kubelet-client certificate and key.
    [certificates] Generated apiserver certificate and key.
    [certificates] apiserver serving cert is signed for DNS names [k8s-master.cs437cloud.internal kubernetes kubernetes.default kubernetes.default.svc
    kubernetes.default.svc.cluster.local] and IPs [10.96.0.1 10.1.1.16]
    [certificates] Generated front-proxy-ca certificate and key.
    [certificates] Generated front-proxy-client certificate and key.
    [certificates] Generated etcd/ca certificate and key.
    [certificates] Generated etcd/server certificate and key.
    [certificates] etcd/server serving cert is signed for DNS names [k8s-master.cs437cloud.internal localhost] and IPs [127.0.0.1 ::1]
    [certificates] Generated etcd/peer certificate and key.
    [certificates] etcd/peer serving cert is signed for DNS names [k8s-master.cs437cloud.internal localhost] and IPs [10.1.1.16 127.0.0.1 ::1]
    [certificates] Generated etcd/healthcheck-client certificate and key.
    [certificates] Generated apiserver-etcd-client certificate and key.
    [certificates] valid certificates and keys now exist in "/etc/kubernetes/pki"
    [certificates] Generated sa key and public key.
    [kubeconfig] Wrote KubeConfig file to disk: "/etc/kubernetes/admin.conf"
    [kubeconfig] Wrote KubeConfig file to disk: "/etc/kubernetes/kubelet.conf"
    [kubeconfig] Wrote KubeConfig file to disk: "/etc/kubernetes/controller-manager.conf"
    [kubeconfig] Wrote KubeConfig file to disk: "/etc/kubernetes/scheduler.conf"
    [controlplane] wrote Static Pod manifest for component kube-apiserver to "/etc/kubernetes/manifests/kube-apiserver.yaml"
    [controlplane] wrote Static Pod manifest for component kube-controller-manager to "/etc/kubernetes/manifests/kube-controller-manager.yaml"
    [controlplane] wrote Static Pod manifest for component kube-scheduler to "/etc/kubernetes/manifests/kube-scheduler.yaml"
    [etcd] Wrote Static Pod manifest for a local etcd instance to "/etc/kubernetes/manifests/etcd.yaml"
    [init] waiting for the kubelet to boot up the control plane as Static Pods from directory "/etc/kubernetes/manifests"
    [init] this might take a minute or longer if the control plane images have to be pulled
    [apiclient] All control plane components are healthy after 32.502898 seconds
    [uploadconfig] storing the configuration used in ConfigMap "kubeadm-config" in the "kube-system" Namespace
    [kubelet] Creating a ConfigMap "kubelet-config-1.12" in namespace kube-system with the configuration for the kubelets in the cluster
    [markmaster] Marking the node k8s-master.cs437cloud.internal as master by adding the label "node-role.kubernetes.io/master=''"
    [markmaster] Marking the node k8s-master.cs437cloud.internal as master by adding the taints [node-role.kubernetes.io/master:NoSchedule]
    [patchnode] Uploading the CRI Socket information "/var/run/dockershim.sock" to the Node API object "k8s-master.cs437cloud.internal" as an annotation
    [bootstraptoken] using token: e83pes.u3igpccj2metetu8
    [bootstraptoken] configured RBAC rules to allow Node Bootstrap tokens to post CSRs in order for nodes to get long term certificate credentials
    [bootstraptoken] configured RBAC rules to allow the csrapprover controller automatically approve CSRs from a Node Bootstrap Token
    [bootstraptoken] configured RBAC rules to allow certificate rotation for all node client certificates in the cluster
    [bootstraptoken] creating the "cluster-info" ConfigMap in the "kube-public" namespace
    [addons] Applied essential addon: CoreDNS
    [addons] Applied essential addon: kube-proxy

    Your Kubernetes master has initialized successfully!

    To start using your cluster, you need to run the following as a regular user:

    mkdir -p $HOME/.kube
    sudo cp -i /etc/kubernetes/admin.conf $HOME/.kube/config
    sudo chown $(id -u):$(id -g) $HOME/.kube/config

    You should now deploy a pod network to the cluster.
    Run "kubectl apply -f [podnetwork].yaml" with one of the options listed at:
    https://kubernetes.io/docs/concepts/cluster-administration/addons/

    You can now join any number of machines by running the following on each node
    as root:

    kubeadm join 10.1.1.16:6443 --token e83pes.u3igpccj2metetu8 --discovery-token-ca-cert-hash sha256:7ea9169bc5ac77b3a2ec37e5129006d9a895ce040e306f3093ce77e7422f7f1c
Effettuiamo le operazioni richieste al fine di terminare la procedura :
Creaiamo una cartella e un file di configurazione nella casella dell’utente (root nel nostro caso)
    mkdir -p $HOME/.kube
    cp -i /etc/kubernetes/admin.conf $HOME/.kube/config
Distribuiamo la nostra rete pod Flannel per il nostro Cluster :
    kubectl apply -f https://raw.githubusercontent.com/coreos/flannel/master/Documentation/kube-flannel.yml
    clusterrole.rbac.authorization.k8s.io/flannel created
    clusterrolebinding.rbac.authorization.k8s.io/flannel created
    serviceaccount/flannel created
    configmap/kube-flannel-cfg created
    daemonset.extensions/kube-flannel-ds-amd64 created
    daemonset.extensions/kube-flannel-ds-arm64 created
    daemonset.extensions/kube-flannel-ds-arm created
    daemonset.extensions/kube-flannel-ds-ppc64le created
    daemonset.extensions/kube-flannel-ds-s390x created
nota: manterremo l'ultimo comando fornito dal ritorno del comando di inizializzazione dal lato ("kubeadm join ...")
per eseguirlo in seguito sulle nostre istanze di lavoro per unirle al nostro cluster.
Ora possiamo effettuare i primi controlli del nostro cluster dalla nostra istanza principale:
Digita il comando "kubectl get nodes" per controllare i nodi presenti nel tuo cluster :
    [root@k8s-master ~]# kubectl get nodes
    NAME 					    STATUS ROLES AGE VERSION
    k8s-master.cs437cloud.internal Ready master 41m v1.12.2
Nota : al momento è presente solo il nodo principale, è normale in quanto non abbiamo ancora aggiunto gli altri nodi al cluster.
Digita il comando "kubectl get pods --all-namespaces" per controllare i pod / container attualmente presenti nel tuo cluster:
    [root@k8s-master ~]# kubectl get pods --all-namespaces
    NAMESPACE 		NAME 		READY 	STATUS 	RESTARTS 		AGE
    kube-system 	coredns-576cbf47c7-fwxj9 1/1 Running 0 		41m
    kube-system 	coredns-576cbf47c7-t86s9 1/1 Running 0 41m
    kube-system 	etcd-k8s-master.cs437cloud.internal 1/1 Running 0 41m
    kube-system 	kube-apiserver-k8s-master.cs437cloud.internal 1/1 Running 0 41m
    kube-system 	kube-controller-manager-k8s-master.cs437cloud.internal 1/1 Running 0 41m
    kube-system 	kube-flannel-ds-amd64-wcm7v 1/1 Running 0 		84s
    kube-system 	kube-proxy-h94bs 1/1 	Running 		0 		41m
    kube-system 	kube-scheduler-k8s-master.cs437cloud.internal 1/1 Running 0 40m
Nota: esistono solo pod corrispondenti ai componenti di Kubernetes necessari per il nostro nodo principale (kube-apiserver, eccd, kube-scheduler, ecc.).
Lo stato di questi componenti può essere verificato con il seguente comando:
    [root@k8s-master ~]# kubectl get cs
    NAME 			STATUS 		MESSAGE		 ERROR
    Scheduler		 Healthy 		ok
    controller-manager Healthy 	ok
    etcd-0 		Healthy 		{"health": "true"}
Aggiungere dei nodi workers al cluster
Operazione da effettuare solo sulle instanze/nodi workers
Su ciascuna delle tue istanze workers (non farlo sull'istanza principale), esegui il comando "kubeadm join ..."
fornito al termine dell'inizializzazione del cluster un po 'più in alto:
    root@k8s-worker01 ~]# kubeadm join 10.1.1.16:6443 --token e83pes.u3igpccj2metetu8 --discovery-token-ca-cert-hash
    sha256:7ea9169bc5ac77b3a2ec37e5129006d9a895ce040e306f3093ce77e7422f7f1c
    [preflight] running pre-flight checks
    [WARNING RequiredIPVSKernelModulesAvailable]: the IPVS proxier will not be used, because the following required kernel modules are not loaded:
    [ip_vs_sh ip_vs ip_vs_rr ip_vs_wrr] or no builtin kernel ipvs support: map[ip_vs:{} ip_vs_rr:{} ip_vs_wrr:{} ip_vs_sh:{} nf_conntrack_ipv4:{}]
    you can solve this problem with following methods:
    1. Run 'modprobe -- ' to load missing kernel modules;
    2. Provide the missing builtin kernel ipvs support

    [discovery] Trying to connect to API Server "10.1.1.16:6443"
    [discovery] Created cluster-info discovery client, requesting info from "https://10.1.1.16:6443"
    [discovery] Requesting info from "https://10.1.1.16:6443" again to validate TLS against the pinned public key
    [discovery] Cluster info signature and contents are valid and TLS certificate validates against pinned roots, will use API Server "10.1.1.16:6443"
    [discovery] Successfully established connection with API Server "10.1.1.16:6443"
    [kubelet] Downloading configuration for the kubelet from the "kubelet-config-1.12" ConfigMap in the kube-system namespace
    [kubelet] Writing kubelet configuration to file "/var/lib/kubelet/config.yaml"
    [kubelet] Writing kubelet environment file with flags to file "/var/lib/kubelet/kubeadm-flags.env"
    [preflight] Activating the kubelet service
    [tlsbootstrap] Waiting for the kubelet to perform the TLS Bootstrap...
    [patchnode] Uploading the CRI Socket information "/var/run/dockershim.sock" to the Node API object "k8s-worker01.cs437cloud.internal" as an annotation

    This node has joined the cluster:
    * Certificate signing request was sent to apiserver and a response was received.
    * The Kubelet was informed of the new secure connection details.

    Run 'kubectl get nodes' on the master to see this node join the cluster.
    [root@k8s-worker02 ~]# kubeadm join 10.1.1.16:6443 --token e83pes.u3igpccj2metetu8 --discovery-token-ca-cert-hash
    sha256:7ea9169bc5ac77b3a2ec37e5129006d9a895ce040e306f3093ce77e7422f7f1c
    [preflight] running pre-flight checks
    [WARNING RequiredIPVSKernelModulesAvailable]: the IPVS proxier will not be used, because the following required kernel modules are not loaded:
    [ip_vs_wrr ip_vs_sh ip_vs ip_vs_rr] or no builtin kernel ipvs support: map[ip_vs:{} ip_vs_rr:{} ip_vs_wrr:{} ip_vs_sh:{} nf_conntrack_ipv4:{}]
    you can solve this problem with following methods:
    1. Run 'modprobe -- ' to load missing kernel modules;
    2. Provide the missing builtin kernel ipvs support

    [discovery] Trying to connect to API Server "10.1.1.16:6443"
    [discovery] Created cluster-info discovery client, requesting info from "https://10.1.1.16:6443"
    [discovery] Requesting info from "https://10.1.1.16:6443" again to validate TLS against the pinned public key
    [discovery] Cluster info signature and contents are valid and TLS certificate validates against pinned roots, will use API Server "10.1.1.16:6443"
    [discovery] Successfully established connection with API Server "10.1.1.16:6443"
    [kubelet] Downloading configuration for the kubelet from the "kubelet-config-1.12" ConfigMap in the kube-system namespace
    [kubelet] Writing kubelet configuration to file "/var/lib/kubelet/config.yaml"
    [kubelet] Writing kubelet environment file with flags to file "/var/lib/kubelet/kubeadm-flags.env"
    [preflight] Activating the kubelet service
    [tlsbootstrap] Waiting for the kubelet to perform the TLS Bootstrap...
    [patchnode] Uploading the CRI Socket information "/var/run/dockershim.sock" to the Node API object "k8s-worker02.cs437cloud.internal" as an annotation

    This node has joined the cluster:
    * Certificate signing request was sent to apiserver and a response was received.
    * The Kubelet was informed of the new secure connection details.

    Run 'kubectl get nodes' on the master to see this node join the cluster.
Verifica dello stato del cluster
Comandi dall’instanza/node master
Verifica che i tuoi nodi workers sono stati aggiunti al vostro cluster e rieseguite il comando « kubectl get nodes »
    [root@k8s-master ~]# kubectl get nodes NAME STATUS ROLES AGE VERSION
    k8s-master.cs437cloud.internal Ready master 46m v1.12.2 k8s-
    worker01.cs437cloud.internal Ready <none> 103s v1.12.2 k8s-
    worker02.cs437cloud.internal Ready <none> 48s v1.12.2
Nota: possiamo vedere i nostri due nodi worker (k8s-worker01 e k8s-worker02), quindi sono stati aggiunti al nostro cluster.
Riavviamo il comando "kubectl get pods --all-namespaces":
    [root@k8s-master ~]# kubectl get pods --all-namespaces
    NAMESPACE     NAME                                                     READY   STATUS    RESTARTS   AGE
    kube-system   coredns-576cbf47c7-fwxj9                                 1/1     Running   0          46m
    kube-system   coredns-576cbf47c7-t86s9                                 1/1     Running   0          46m
    kube-system   etcd-k8s-master.cs437cloud.internal                      1/1     Running   0          46m
    kube-system   kube-apiserver-k8s-master.cs437cloud.internal            1/1     Running   0          46m
    kube-system   kube-controller-manager-k8s-master.cs437cloud.internal   1/1     Running   0          46m
    kube-system   kube-flannel-ds-amd64-724nl                              1/1     Running   0          2m6s
    kube-system   kube-flannel-ds-amd64-wcm7v                              1/1     Running   0          6m31s
    kube-system   kube-flannel-ds-amd64-z7mwg                              1/1     Running   3          70s
    kube-system   kube-proxy-8r7wg                                         1/1     Running   0          2m6s
    kube-system   kube-proxy-h94bs                                         1/1     Running   0          46m
    kube-system   kube-proxy-m2f5r                                         1/1     Running   0          70s
    kube-system   kube-scheduler-k8s-master.cs437cloud.internal            1/1     Running   0          46m
Nota: possiamo vedere che ci sono tanti pod / container "kube-flannel" e "kube-proxy" quanti nodi nel nostro cluster.
Implementare il primo pod
Andremo a implementare il nostro primo pod nel nostro cluster Kubernetes
Per semplicità scegliamo di implemenatreun pod (sense repliche) con il nome di « nginx » e utilizzeremo l’immagine « nginx »
[root@k8s-master ~]# kubectl create deployment nginx --image=nginx deployment.apps/nginx created
Se controlliamo, apparirà al ritorno del comando che elenca i pod del nostro cluster:
    [root@k8s-master ~]# kubectl get pods --all-namespaces
    NAMESPACE     NAME                                                     READY   STATUS    RESTARTS   AGE
    default       nginx-55bd7c9fd-5bghl                                    1/1     Running   0          104s
    kube-system   coredns-576cbf47c7-fwxj9                                 1/1     Running   0          57m
    kube-system   coredns-576cbf47c7-t86s9                                 1/1     Running   0          57m
    kube-system   etcd-k8s-master.cs437cloud.internal                      1/1     Running   0          57m
    kube-system   kube-apiserver-k8s-master.cs437cloud.internal            1/1     Running   0          57m
    kube-system   kube-controller-manager-k8s-master.cs437cloud.internal   1/1     Running   0          57m
    kube-system   kube-flannel-ds-amd64-724nl                              1/1     Running   0          13m
    kube-system   kube-flannel-ds-amd64-wcm7v                              1/1     Running   0          17m
    kube-system   kube-flannel-ds-amd64-z7mwg                              1/1     Running   3          12m
    kube-system   kube-proxy-8r7wg                                         1/1     Running   0          13m
    kube-system   kube-proxy-h94bs                                         1/1     Running   0          57m
    kube-system   kube-proxy-m2f5r                                         1/1     Running   0          12m
    kube-system   kube-scheduler-k8s-master.cs437cloud.internal            1/1     Running   0          57m
È in cima all'elenco in un namespace diverso da "sistema kube" poiché non è un componente specifico del funzionamento di Kubernetes.
È possibile non visualizzare pod specifici dei spacename del kube-system eseguendo lo stesso comando senza il parametro "--all-namespace":
[root@k8s-master ~]# kubectl get pods NAME READY STATUS RESTARTS AGE nginx-55bd7c9fd-vs4fq 1/1 Running 0 3d2h
Possiamo anche controllare tramite il seguente comando:
[root@k8s-master ~]# kubectl get deployments NAME DESIRED CURRENT UP-TO-DATE AVAILABLE AGE nginx 1 1 1 1 93m
Quindi abbiamo un pod nginx distribuito e avviato ma attualmente non accessibile dall'esterno.
Per renderlo accessibile dall'esterno, dobbiamo esporre la porta del nostro pod creando il servizio (di tipo NodePort) tramite il seguente comando:
    [root@k8s-master ~]# kubectl create service nodeport nginx --tcp=80:80 service/nginx created
    Il nostro servizio è cosi stato creato :
    [root@k8s-master ~]# kubectl get svc NAME TYPE CLUSTER-IP EXTERNAL-IP PORT(S) AGE kubernetes ClusterIP 10.96.0.1 <none> 443/TCP 147m nginx NodePort 10.108.251.178
    <none> 80:30566/TCP 20s
Nota: Laporta 80 / tcp sarà disponibile / esposto dall'esterno sulla porta 30566 / tcp
Possiamo ottenere l’ip-flannel del nostro pod, nonché il nome del nodo su cui è attualmente in esecuzione tramite il seguente comando:
    [root@k8s-master ~]# kubectl get pods --selector="app=nginx" --output=wide
    NAME                    READY   STATUS    RESTARTS   AGE    IP           NODE                               NOMINATED NODE
    nginx-55bd7c9fd-vs4fq   1/1     Running   0          174m   10.244.2.2   k8s-worker02.cs437cloud.internal   <none>
Qui il nostro pod nginx ha ip 10.244.2.2 e gira sul nostro nodo k8s-worker02.
Puoi anche semplicemente eseguire un comando o aprire una shell sul nostro pod nginx tramite il seguente comando (molto simile al comando docker):
[root@k8s-master ~]# kubectl exec -it nginx-55bd7c9fd-vs4fq -- /bin/bash root@nginx-55bd7c9fd-vs4fq:/#
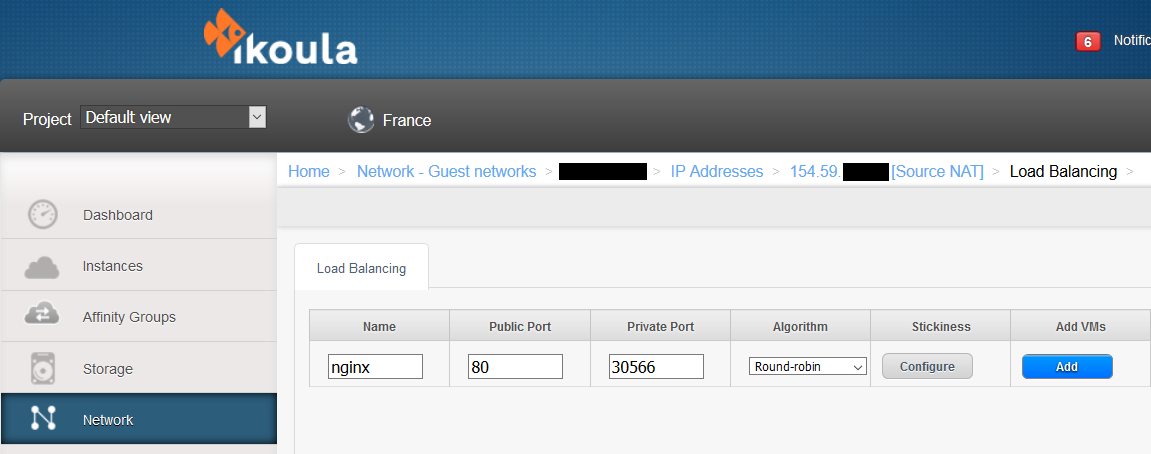
Tutto quello che devi fare è creare la tua regola di bilanciamento del carico sulla tua rete Cloud Ikoula One per accedere / pubblicizzare il tuo server web (pod nginx):
- Accedi all'interfaccia Cloud Ikoula One
- vai su "Rete" nel menu verticale a sinistra
- fai clic sulla tua rete in cui hai distribuito le tue istanze di Kubernetes, quindi su "Visualizza indirizzi IP" e sul tuo IP di origine NAT e vai alla scheda "Configurazione"
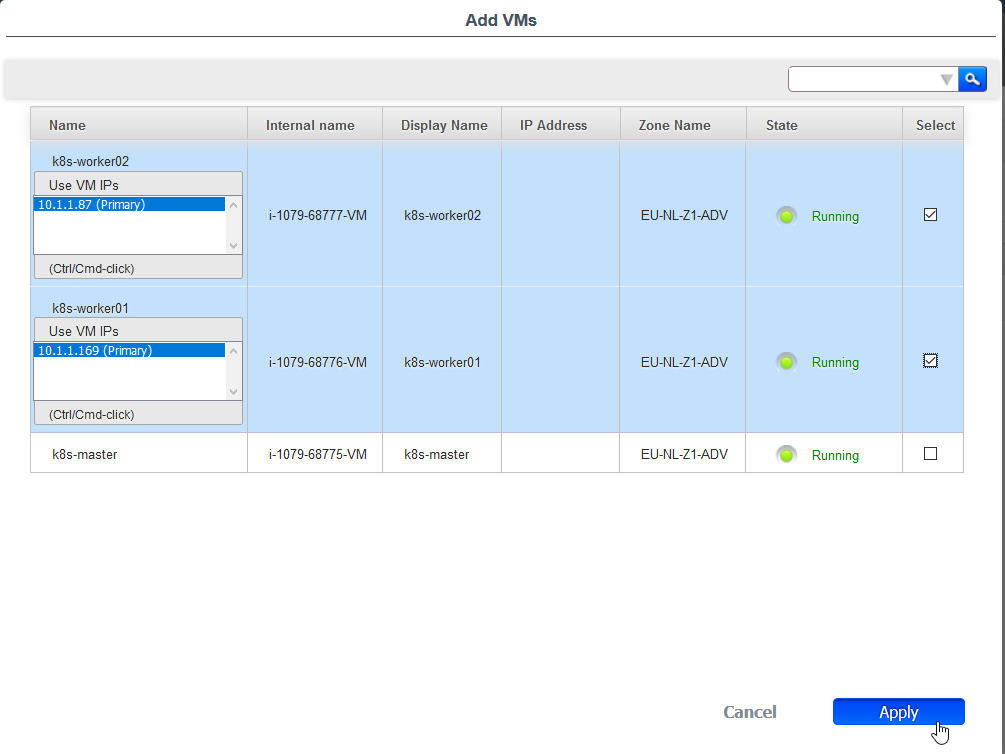
- fai clic su "Load Balancing" e crea la tua regola specificando un nome, la porta pubblica "80" nel nostro caso, la porta privata "30566" nel nostro caso (vedi sopra), scegliendo un algoritmo LB (es: round-robin) come:
Controlla tutte le tue istanze workers
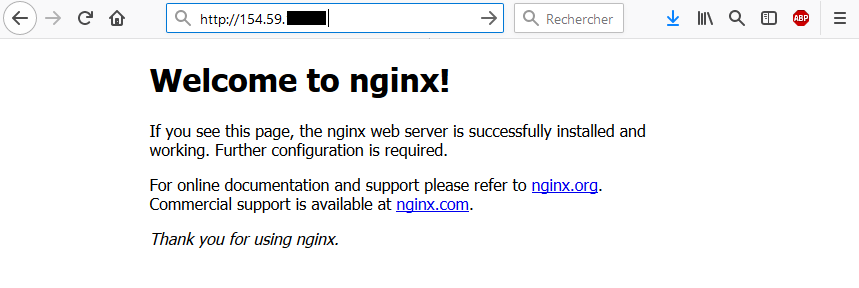
Prova l'accesso al tuo server web / pod nginx dal tuo browser (tramite l'IP pubblico della tua rete su cui hai creato la regola LB):
Il fatto che il tuo pod nginx sia accessibile da qualsiasi nodo è reso possibile dal componente "kube-proxy" che è responsabile delle connessioni sui nodi su cui viene eseguito
« questo qui / questo qua » (in caso di repliche).
Hai appena distribuito un cluster Kubernetes core di 3 nodi con un master e due worker.
Vai oltre
Puoi andare oltre implementando la dashboard di Kubernetes o creando volumi persistenti per i tuoi pod,
ad esempio aumentando il numero di nodi di lavoro o addirittura ridondando il ruolo principale per rendere alta la disponibilità o anche dedicare
nodi a determinati componenti come Etcd, ad esempio…
Qualche link utile
- https://kubernetes.io/docs/reference/kubectl/cheatsheet/
- https://kubernetes.io/docs/reference/kubectl/docker-cli-to-kubectl/
- https://kubernetes.io/docs/concepts/storage/volumes/
- https://kubernetes.io/docs/tasks/configure-pod-container/configure-persistent-volume-storage/
- https://kubernetes.io/docs/tasks/access-application-cluster/communicate-containers-same-pod-shared-volume/
- https://kubernetes.io/docs/tutorials/stateful-application/mysql-wordpress-persistent-volume
Questo articolo ti è stato utile ?


Attivare l'aggiornamento automatico dei commenti